Easy Butterfly Clothespin Craft to Make With Kids
Love this Easy Butterfly Clothespin Craft to Make with Kids. Use cupcake liners and add a magnet to stick on the refrigerator of course!
Servings: 1 Butterfly Clothespin Craft
Cost: $2
Equipment
- Hot glue gun and glue or tacky glue
Ingredients
- Clothes pins of whichever type you prefer
- Cupcake liners, either designed or plain
- Pipe cleaners
- Colored Markers
- Googly eyes (optional)
- Decorating items, such as pom-poms, gemstones, pony beads, other beads, etc.
- Hot glue gun and glue or tacky glue
- Round magnets (optional)
Instructions
- I was able to find some really cute cupcake liners with fun patterns on them in the store. There are many options in stores and online. They make this craft colorful and go together very quickly. But if you just have plain cupcake liners, like we usually have on the shelf for baking, those work equally as wellIt’s fun for kids to decorate the plain cupcake liners and this would be part of the first step in this craft if you would like to do it.
- Lay two cupcake liners out in front of you for your butterfly. I love the combination of a pattern and a plain together like I was able to do with the cupcake liners that I purchased.We are going to accordion fold both cupcake liners as a first step.Fold the paper up along one edge a little less than a half of an inch. Flip the paper over and then fold it up again in the same amount.Repeat this until you have folded up the entire cupcake liner. If this is not very clear to you it really helps to watch the full length tutorial video which will show you exactly what it looks like.Accordion fold both of your cupcake liners. Then fold them in half so you can see where the middle point is on each of those folded papers.
- Get those wooden clothespins out for this step.Take the two liners and place them one on top of the other and pinch them between your fingers on that centerfold line that you made earlier.I put my designed cupcake liner on the top and my solid one on the bottom for my butterfly, but you can put yours together, however you would like.We are wanting to pinch them in way that makes them not as wide in the center. This is so you will be able to slip them into the clothespin, one on top of the other. They are a bit wide as they are right now. So kind of pinch and fold them in the center.Then open up the clothespin and place that pinched center area of the cupcake liners in the little hollowed circle area of the clothespin. Allow it to shut over the two cupcake liners.
- The next step is to fan out those papers to be the wings of the butterfly.Gently pull on the cupcake liner one section at a time. Open up the folds of the paper so it fans out into a rounded shape. Repeat this with each of the four sections of the wings and you'll see the butterfly shape "unfold" (bad pun).
- Now the last step is to add things to our butterfly body to decorate and personalize it.The first thing I added were antennae. Take a pipe cleaner and cut about a 4 inch piece. Twist the ends around the tip of a pencil to make the circular ends of each antenna.Fold the pipe cleaner in half. Then gently open the top of the clothespin and slip that center folded area in so that the two antenna tips stick upwards from the clothespin.
- I’m a big believer in adding googly eyes to things so you will see me adding googly eyes to every one of the butterflies that I decorate.I use hot glue but for littles consider using tacky glue or self-adhesive googly eyes.You can also draw eyes on your butterfly instead of using googly eyes if you would like.
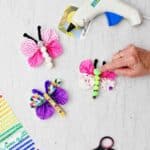
- Take out the craft supplies you would like to use to decorate the clothespin body of the butterfly. Here are a couple ideas for you.three fun options for decorating your butterfly clothespin craft: coloring the body of the butterfly, adding gemstones and googly eyes, or adding pom-poms and googly eyes.You will have many more ideas of your own!
- Lastly, here's an extra bonus step!! You can glue a magnet to the back of the clothespin to make it a refrigerator magnet. Every refrigerator needs more magnets!Place some hot glue on the back of the wooden clothespin. Place the magnet into the hot glue and allow it to cool. I'm sure tacky glue could work for this purpose but would take more time to dry of course.
Video
Notes
It’s wise to put some paper (newspaper, paper towel) out on your surface area and then flatten the cupcake liner out on that before they start doing their coloring.
A smaller child may need help with an accordion fold as they are developing their fine motor skills.