Easy Baseball Drawing
How to Draw a Baseball takes the sphere shape drawing out to the ball game and leaves it in stitches. You can learn to draw a baseball with my step-by-step help.
Servings: 1 Baseball drawing
Cost: $1
Equipment
- none needed
Ingredients
- Drawing pencils (optional- can use a #2 pencil for sketching)
- Sketch pad (optional- can use scratch paper or copy paper for practice)
- Baseball or Softball (optional- but useful for seeing the actual object you are drawing)
Instructions
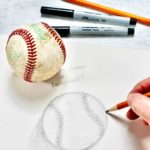
- Prep: If you have a baseball (or softball) place it on the table in front of you. It always helps to have the visual. You can pull up a picture on your computer or phone as well if you want.It is great to have a sketch pad of paper where you can doodle and practice as you learn to draw- but any paper will do. Get our your Drawing pencils.
- Step 1: Draw a Sphere shape- Start this drawing with the sphere shape and techniques that were taught in WTN How to Draw a Sphere. The circle shape can be drawn by hand or by using a circle object like the top of a cup or a small lid to a round container.
- Step 2: Shading- Next, add some shadow below the circle (to the side that is opposite of the light source, this is where the shadow is cast). You can draw a little “sun” shape up at the top right to remind you of where the light is coming from if you want.
- Step 3: Add seams to the baseball- Add the lines that represent where the leather pieces meet on the ball. These are the seam lines of the baseball. They are in a gentle “s” shape on the right and a backwards “s” shape on the left.Next, draw the stitches on the baseball. The stitches are little “v” marks down the seam lines.
- Step 4: Finish shading the baseball- Continue to use shading around the edges of the ball, contour lines, and some blending (I often call it smudging) until you are satisfied with the look of the drawing.Tip: Leave a part of the ball basically white with no smudging to give the appearance of light hitting the surface of the baseball in that area. This will be in the upper right center area of the baseball if your light source is to the upper right side.Draw any extra marks or scuffs on the ball, blend them a bit.
Notes
There are tips on the post that are helpful.
The video is also very helpful- follow along and stop as needed to finish a step!