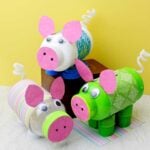
Cute DIY Piggy Bank from a Recycled Bottle
Kids can make their own Cute DIY Piggy Bank from a recycled bottle with this simple craft tutorial. These piggy bank ideas are fun, adaptable and help them WANT to save money!
Servings: 1 Piggy Bank
Cost: $2
Equipment
- none needed
Ingredients
- 1 Recycled Bottle- A recycled bottle like a vitamin bottle or half gallon vinegar bottle. Laying on its' side the bottle should have a pig shape. Remove the label.
- Bottle Lids or TP rolls For legs use 4 bottle lids or 2 toilet paper roll tubes.
- Spray paint Spray paint (for use on plastic) to paint the bottle- optional. The spray paint can be any color.
- Paper Pink scrapbook paper for ears and nose of the piggy bank (or pink copy paper).
- Googly eyes The pig eyes are made with googly eyes.
- Pipe cleaner A pink or white pipe cleaner for a tail
- Glue Tacky glue, hot glue, or E6000 glue.
- Craft knife A craft knife to cut the bottle.
Instructions
Cut a coin slot
- Draw a rectangle shape lengthwise on the bottle- about ¼ inch wide and 1 ½ inch long. Cut a coin slot in the top of the bottle with an craft knife. Use an up and down movement with the knife to prevent slicing the bank.
Spray painting the bottle (optional step)
- If you want the legs of the pig the same paint color add them to the pig now.Glue 4 bottle caps under the bottle (with the coin slot up). OR Cut the two TP rolls in half. Slit them and hot glue them so they are smaller in diameter. Push down the edge of one end and use this edge to hot glue the 4 TP tubes under the bottle for 4 legs. Keep the coin slot side of the bottle up.Take the bottle outside, lay down paper, and spray paint it the color of your choice.
Decorate, face & tail of piggy
- Use your scrapbook papers to decorate the pig. You can cut a paper strip to cover the body and glue it around the bottle. Add other decorations to the bank (optional).Glue the four bottle lids to the bottom of the pig as four legs now if not done earlier when spray painting.Trace around the lid of the bottle on the pink scrapbook paper. Cut it out and glue it onto the lid as the pig's nose. Draw two black dots on the nose for nostrils.Make ears for your pig by drawing a 2 ½ inch teardrop shape on the pink paper. Then draw a line to make the rounded end of the teardrop shape flat. Add a ½-inch tab on the flat edge of the line you just drew. Fold the paper so that when you cut it out you will cut two ears at one time. Cut out the ears around the outside line. Fold over the half inch tabs on the bottom of the ear papers and use the tab to glue them to the bottle. Glue them behind the bottle opening/lid, which will be the nose.Glue googly eyes between the nose and the ears you just mounted on the piggy bank.Form the pipe cleaner into a twirl by twisting it around your finger. Make one end into a flat circle for gluing onto the bottle.Glue the pipe cleaner onto what was the bottom of the bottle. This makes the twirly tail.
Video
Notes
This craft will take longer if you spray paint the bottle and let it dry.
Craft tips and variations are found on the post instructions.