Fast Upcycled Picture Frame
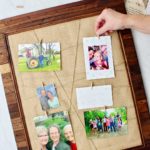
A Fast Upcycled Picture Frame Holiday Photo Project with string & burlap. Holiday guests bring photos to clip on in gratitude.
Servings: 1 Gratitude Photo Project
Cost: $5
Equipment
- Scissors
- Stapler (optional)
Ingredients
- Picture frame (mine is 16x20 inches opening size)
- Piece of heavy cardboard or foam board
- Packaging tape
- Glue (optional)
- Burlap piece large enough to fit the frame plus a couple inches
- Twine or string
- Clothespins (the little ones are cute but the larger size work well too)
- Picture points (also called glazier points) (optional)
Instructions
- If your frame has an inset board and glass, take those out and set them aside.
- Cut a piece of heavy cardboard or foam board to ¼-3/8-inch smaller size than the frame size to give room for tucking burlap and wrapping string or twine. You may have to trim this off a bit smaller if it doesn’t fit in the frame.
- Lay this cardboard on top of the burlap and cut the burlap several inches larger.Tuck the burlap to the back of the cardboard. Gently stretch it and use the packing tape to tape it to the back.Note: If you want to make this a permanent project, cut the burlap to the size of the cardboard and glue it to the front of the cardboard. Give the glue time to dry before going to the next step.
- Slip the cardboard piece into the frame and tape it to the back of the frame with the packing tape.
- Option 3: Tie a knot in the string and staple it to the back of the board.Pull the string to the opposite side of the board and staple it. Go back an forth across the frame and staple the string to each side until you are satisfied with how it looks. Cut the string, tie a knot in it and staple it to the side of the frame.
- For all 3 options: Hang up your frame, set it on an easel or lean it against the wall on a shelf or piece of furniture. It looks so nice.Use clothespins of whatever size you choose to clip the pictures onto the strings.