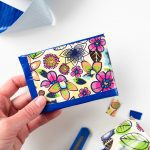
How to Make a Duct Tape Wallet
Let the kids choose their own colors and patterns to make their own customizable Duct Tape Wallet!
Servings: 1 Wallet
Cost: $4
Equipment
- Cutting surface, like a White Plastic Cutting Board 18 x 12 x 0.75″ or a Self-Healing 18×24″ Cutting Mat
- Cutting utensil like a Fiskars HD Craft Knife
- Ruler with metal edge- I like an Stainless Steel, 12 inch Ruler
- Plastic credit or gift cards (for size)
Ingredients
- Duct tape Patterned and Colored Duct Tape of your choice
- Clear plastic piece (like from a 10 Transparent Report Covers)
Instructions
PIECE NUMBER 1- MAKE DUCT TAPE “FABRIC”
- Measure out 8 pieces of duct tape, each 9 inches or more long. Tear them off.
- Lay 4 pieces down, all sticky-side up, and stick them together- one by one- by overlapping the long edges by ½ inch.
- Stick the other 4 pieces to the first 4 pieces, sticky-side down, overlapping by ½ inch- but leave ½ inch uncovered at the top when you start. Fold over the extra ½ inch at the top then flip it over and fold over the extra ½ inch at the bottom. This is your “fabric” (it is about 6 inches by 9 inches in size).
- Using the ruler and utility knife, trim a little bit off one of the torn ends of the duct tape fabric so that it is square. (Be precise.) Be sure to use a cutting board! Measure the fabric at 8 ½ inches long and trim off the other torn end. Now the “fabric” is 6 inches by 8 ½ inches in size.
PIECE NUMBER 2- POCKETS FOR YOUR CREDIT/GIFT CARDS
- Measure out 4 pieces of duct tape, each 5 inches long. Tear them off.
- Repeat the fabric layering technique from earlier. Lay 2 pieces down, sticky-side up, and stick them together- one by one, by overlapping the long edges by ½ inch. Stick the other 2 pieces to the first 2 pieces, sticky-side down, overlapping by ½ inch- but first leaving ½ inch uncovered at the top when you start.
- Fold over the extra ½ inch at the top then flip it over and fold over the extra ½ inch at the bottom. Your “fabric” is about 3 inches by 5 inches in size. This is pocket piece A.
- Using the ruler, trim a little bit off one of the torn ends of the duct tape fabric so that it is square. Measure the pocket piece A at 4 inches long and trim the other end so that it is square. Now this “fabric” piece is 3 inches by 4 inches in size.
POCKET PIECE B AND POCKET PIECE C
- Measure two pieces of duct tape, each 9 inches long. Tear them off.
- Lay 1 piece, sticky-side up, and lay the second piece, sticky side down, directly on top of it, matching the edges.Using the ruler, trim a little bit off one of the torn ends so that is square.
- Measure and cut two 4 inch pieces (pocket pieces B and C).
- Measure out a 5 inch piece of duct tape. Tear it in half the long direction.
- Lay one strip over the top of pocket B and fold down over the back. Lay the second strip over the top of pocket C and fold down over the back.
- Trim off the extra ends of the strips to the same length as the pockets (4 inches)
PUTTING THE POCKET PIECES TOGETHER
- Tear off a 4 inch piece of duct tape. Tear it in half the long direction.
- Layer the 3 pocket pieces with pocket A at the bottom, pocket B next, pocket C on top. Pocket B and C are each lower than the one before by about ½ inch.
- Place a credit card in the center of the pocket pieces. The card size shows you where to put the tape on each end of the pocket pieces.
- Use one 4 inch strip to fold over the left edge of the pocket pieces (don’t go over the card). Fold the extra to the back of the pocket pieces. This holds pieces A, B and C together.
- Trim the extra ends of the strips to be the same size as the pocket pieces.This will provide pockets for the cards in your wallet.
PIECE NUMBER 3- THE ID CARD WINDOW
- Cut a 4 inch by 3 inch piece of clear plastic.
- Fold the second 4 inch strip of duct tape over one of the shorter ends of the plastic piece, fold the extra to the back.
- Trim the ends of the strip to be the same size as the plastic.
ASSEMBLING THE WALLET
- Fold the 6 inch by 8 inch sized piece of duct tape “fabric” the long way. Make a crease and then open it away from you.
- Place the pockets along the right top edge of the “fabric” with the tape covered edge to the left (the center of the wallet).
- Place the plastic ID card window along the left top edge of the “fabric” with the tape covered edge to the right (the center of the wallet).
- Tear off a 9 inch piece of duct tape. Tear it in half the long direction.
- Fold one strip over the top edge of the “fabric” and pocket pieces. Fold the extra over to the back. This holds all three of the pieces together.
- Trim off the extra of the strip to the same size as the fabric. (Save the other half of this 9 inch strip, you’ll need it later)
- Fold the wallet along the crease (position so the pockets are facing you, crease is at the bottom).
- Tear off a 4 inch piece of duct tape. Tear it in half the long direction.
- Fold one 4 inch strip over the right short end of the wallet. Don’t cover the card. Fold the extra to the back of the wallet. Trim the strip to the same size as the wallet. Repeat this on the opposite short end of the wallet.
- Fold the other 4 inch strip over the left short end of the wallet. Don’t cover the card. Fold the extra to the back of the wallet. Trim the strip to the same size as the wallet.
- Fold the second 9 inch strip over the bottom edge of the wallet. Fold the extra over to the back. Trim the strip to the same size as the wallet.
- Fold the wallet in half with the pockets to the inside and create a crease.
- Fill it up with your cards, your ID and your money!!