Mini Pumpkin Halloween Decorations
These Mini Pumpkin Halloween Decorations are perfect for an upcoming Halloween party or a fast Halloween craft idea with the kids!
Servings: 7 Pumpkin Decorations
Cost: $3
Equipment
- Welcome to Nana's printable picture instructions
- Newspaper or surface protector
- Paint brushes
- Paper plate for paints
- Hot glue gun
Ingredients
- 7 Mini pumpkins
- 4 colors Acrylic paint black, green, purple, white
- 8 Pipe cleaners black, for spider
- Googly eyes at least ½ inch in size
- 4 pieces Construction paper black, brown, orange, green
- 2 Push pins black, for Frankensteing face
- Hot glue and craft glue
Instructions
- Put out some newspaper to protect your table and then paint the pumpkin the color noted on the instructions. Let them dry for a few minutes.
- Paint facial features and cut out construction paper pieces as shown. Each pumpkin design is a bit different.
- Spider: Use an ice pick to make 8 holes in the pumpkin, 4 on each side. Crumple the pipe cleaners up in a zig-zag pattern and then insert one end of each pipe cleaner into each of the 8 holes. The face is only two google eyes.
- Black Cat: Paint all facial features in white. Paint slanted ovals for the eyes and once dry, glue the google eyes onto the white oval painted space.
- Bat: Paint the facial features in white. The mouth is a white outline smile and then white painted teeth along the outline. The inside of the mouth is left black. Cut two pointed ears out of paper and make the large enough to fold back a flap to glue onto the pumpkin. Cut out the two wings at the same time so they are the same shape and fold back a flap to glue on the pumpkin as well.
- Owl: Paint the face area shape white. Cut out triangles for the two ears and a set of two wings. Glue these on the pumpkin as shown (do not use flaps for these pieces). Cut a triangle beak out of orange paper and glue onto the white face area. Cut two feet out of orange paper and glue to the bottom of the pumpkin. Glue the google eyes onto the white face area.
- Witch: Remove the stem from the pumpkin. Cut an approximately 4 inch diameter circle of green paper. Cut ¼-1/2 inch fringe around the circle. Crumple the fringe. Glue this onto the top of the pumpkin for hair. (You can add a second paper circle cut the same way if you want more hair.) Cut another 4 inch circle from black paper. Glue this on top of the hair for the brim of the hat. Roll a cone out of black paper and glue in shape. Trim so it is two inches tall. Glue onto the center of the brim of the hat. Paint the nose and mouth in black. Glue on the google eyes.
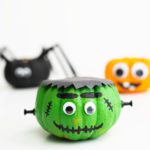
- Frankenstein: Paint the pumpkin green. Cut a 4 inch diameter circle from black paper. Cut ¼-1/2 inch fringe around the circle. Crumple the fringe. Glue this onto the top of the pumpkin for hair. (You can add a second paper circle cut the same way if you want more hair.) Paint the eye brows, scars and mouth with black paint. When dry, glue on the google eyes. Push one black push pin into each side of the head.
- Silly Faces: Have fun painting silly faces with black and white paint onto the pumpkin. Glue on google eyes. Add hair or bows or other decorations as desired to give your pumpkin real personality!