How to Make Your Own Miniature Journal
These DIY Miniature Journals are such a fun and easy paper craft for kids (okay, adults too)!
Servings: 1 journal
Cost: $1
Equipment
- Hot glue gun
- Glue stick or school glue
- Scissors
- Ruler
- Pencil
- 2 Binder clips
Ingredients
- 6 pieces Printer paper (can use other kinds, even homemade paper)
- 1 piece Poster board (for a cover)
- 1 piece Scrapbook paper (to cover the poster board)
- Colorful pens, pencils, eraser
Instructions
- Fold a piece of typing paper (or other paper type of your preference) hamburger fold, then fold it again the same direction. Unfold and fold it in half, hot dog fold.
- Next, cut the paper into fourths and fold each fourth on the fold line in the center. Stack these up with all folds on one side. Repeat with about 5 more sheets of paper and stack them all up, folds on one side.
- Hold the papers together with a binder clip on each end so the folded edges are straight and held together well.
- Put a layer of hot glue along all of the folded edges of the papers so they are “bound” together.
- Cut a poster board piece that is 4 ½ inches by 6 inches long for the cover of your book. Fold this so it has to “flaps” and a “binder” by folding in the short edge 2 ⅞ inches on both ends. This creates two cover flaps and a center binder giving space for the pages of the journal.
- Lay the poster board down on the wrong side of the scrapbooking paper that you have chosen and cut about an extra inch all around the poster board size. Use a glue stick to glue the poster board to the center of this paper and then fold the extra paper onto the top side of the poster board on all four sides. Glue these flaps down.
- Use some hot glue on the binder area of the cover. Quickly place the glue bound edge of the pages on the center binding area of the cover.
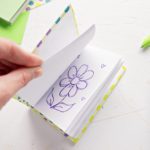
- Glue (can use glue stick or school glue) one of the white typing paper pages down to the inside cover on the front for the journal and the inside of the back of the journal. This attaches the papers to the cover piece. Allow to sit and dry.
Video
Notes
Tip: If your paper is thicker you may need to do 4 sheets of paper. If you want more pages you will need to alter the size of the spine and the cover of your journal to be wider so the pages will fit correctly.