How to Make Crystals: DIY Crystals Home Science Project
Want to learn How to Grow Crystals at Home? Growing crystals is an artsy home science project that lets you watch them grow each day!
Servings: 1 Crystal Garden
Cost: $10
Equipment
- Glass pie plate
- Mason jar (or other glass jar)
- Nonmetal string utensil
Ingredients
- Non- iodized salt (plain salt)
- Mrs. Stewart’s liquid bluing (found in the laundry section)
- Ammonia (found in the cleaning section)
- Distilled water
- Liquid food coloring
- Charcoal briquettes, or some other porous item like a sponge
- Glass pie plate
- Mason jar (or other glass jar)
- Nonmetal string utensil
Instructions
- Use a glass pie plate to hold the briquettes. It’s best to use glass items for everything that you do in this experiment.Spread the charcoal out in one layer over the bottom of the container.Use a little bit of water either from a glass or from a spray bottle to lightly wet down the briquettes. I used a spray bottle and it worked really well. Spray until they are wet, but not sitting in water. If you get too much water, pour it out of the pie plate.
- You will take 3 tablespoons of each of your ingredients and measure them into a mason jar or other clean container of glass. (That is 3 tablespoons each of salt, liquid bluing, ammonia, and distilled water.)It's a good idea to place the glass jar on a paper towel to protect the counter.Note: it is easiest if you use hot water as it will help the salt to dissolve. The hot water may result in bigger crystals as the water cools.Stir with a nonmetal stirring item until the salt is dissolved. I used a glue stick for this as I did not want to use one of my metal spoons nor did I want to use a wooden spoon and dye it blue with a liquid bluing.
- When the salt is dissolved, pour the solution over the charcoal briquettes. Take a little bit more of the distilled water and pour it into the Mason jar. Stir it around to dissolve any of the extra ingredients or undissolved salt that might have been left in the bottom of the jar. Pour this over the briquettes as well.Note: The ingredients in this activity are toxic and are not safe to have around young children. I recommend doing this experiment with older children and under adult supervision.This activity will last for several days so it’s important to continue to keep it away from young children and your pets, too, of course.
- Next, take the liquid food coloring and add drops of food coloring to the briquettes. I used red, yellow, and blue, because they all came in a small box together.Lastly, take two more tablespoons of salt and sprinkle it over the top of the briquettes.The crystals will be white or clear on the areas of the charcoal that are left without drops of food coloring.
- The briquettes will be sitting in this solution for the next several days as you watch your own crystals grow.So carefully set your pie plate in an area where it will not be disturbed and where it is safe from young children and pets. If it’s disturbed and bumped, it may disturb the crystals growth. It might also slosh some of the liquid back up on the briquettes and dissolve the crystals that have already grown.
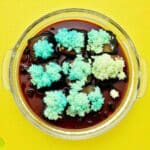
- Check your crystals every day.I couldn’t wait till the next day to go see the crystals and checked it every few hours or so. New crystals were growing within 12 hours. I left mine sitting for about 72 hours and the last picture is the growth at 72 hours of time. I love the shape of crystals.All of my crystals were yellow, green and blue. None of them were red from the red food coloring. I’m not sure why that happened. I’d like to try it again sometime and only use red food coloring and see what happens.Now you can see why I call it an artsy science activity!
Video
Notes
There is some explanation as to why the crystals form on the blog. Check it out at the link above!