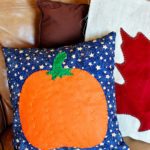
Sew a Pumpkin Fall Pillow
Sew a Pumpkin Fall Pillow for your couch. Learn an easy embroidery stitch to applique on a felt pumpkin or jack-o-lantern! Great skills you can use over and over again.
Servings: 1
Cost: $10
Equipment
- Sewing machine
- Scissors, pins
- Embroidery needle
- White fabric marking pencil or chalk
Ingredients
- Copy of the Sew a Pumpkin Fall Pillow Free Pattern
- Fabric- ½ yard fabric of your choice (⅔ yard if making a pillow larger than 16x16 inches)
- Thread
- Pillow form (in desired size) OR Fiber fill stuffing
- Felt- 8x12 inch pieces of orange, green, black
- Embroidery floss in orange, green, black
Instructions
- Lay the fabric out and cut a square that is ONE INCH larger (both directions) than the size of the pillow you would like when you are finished.
- Cut the pumpkin shape out of the orange felt, the stem and leaf out of the green felt and the jack-o-lantern face out of black felt. The face is optional.
- Pin the pumpkin piece of felt on the right side of one of your pillow fabric pieces. Attach the pumpkin to the fabric with an embroidery stitch called the blanket stitch.
- There are videos on how to do these embroider stitches and how to sew a pillow on the website post by this name: https://welcometonanas.com/sew-a-pumpkin-fall-pillow
- Use the white fabric marking pencil to make “smile” lines (ribs) that run from the stem point to the center bottom of the pumpkin. I have marked these on your pattern with a dotted line. Here is the link to that pattern again if yours is cut into pieces already.Use the Running Stitch to make the lines on the pumpkin.
- Attach the stem and the face to the pumpkin with the Blanket Stitch.
- Sew the pillow: Place the two pieces of fabric together with the right sides facing one another, right sides together. Pull and move the fabric around until the edges match. Pin in place all around the edges.If you are using a pillow form like I did, sew a ½ inch seam around three edges of the pillow. Backstitch when you start and when you finish to keep it from unravelling. If you are using fiber fill stuffing, sew a ½ inch seam around all four edges of the pillow but leave a 4-inch opening. Backstitch when you start and when you finish to keep it from unravelling.
- Cut the corners of the pillow at an angle as shown in the picture- but DO NOT cut through the sewing threads or your seams will unravel and there will be holes in the corner of your pillow. This step takes out extra fabric in the corners of your pillow when you turn it inside out.Next, turn your pillow inside out through the hole that you have left. Work on the corners until they are as square as possible.
- Slip the pillow form inside the pillow (like a pillowcase) OR stuff the pillow with fiber fill through the 4-inch hole until it is full like you want it.
- Pin the edge of the pillow that you left open for stuffing. The edges of each piece of fabric should be folded in ½-inch. Sew across this pinned edge, close to the edge but catching both edges of the two pieces of fabric. Take the pins out as you sew.