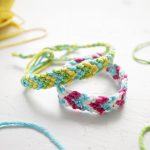
Chevron Macrame Friendship Bracelet
Once you get the hang of these Chevron Macrame Friendship Bracelets, you'll want to make as many as you can for yourself, and to give as gifts!
Servings: 1 Bracelet
Cost: $2
Equipment
- Scissors
- Safety Pins (optional)
Ingredients
- Embroidery Floss in various colors (3-7 colors)
- Scotch Tape (optional)
Instructions
STEP 1:
- First it is important to learn these two basic macramé knots.
Left and Right Hand Knots
- Left hand knot (goes from the left to the right). Take the far left blue strand and cross it over the top of the next green strand, like a bent “L”.
- Wrap the blue strand around the back of the green strand and back out through the loop of the blue strand.
- Hold the green strand and pull the knot you just made up to the top where all the floss is knotted so it is tight. Repeat to finish the left hand knot. Note- always do the left hand knot two times for this bracelet pattern.
- Now the green strand is on the far left and the blue strand is second over from the left.
- Right hand knot (goes from the right to the left). Take the far right blue strand and cross it over the top of the next green strand, like a backwards bent “L”.
- Wrap the blue strand around the back of the green strand and back out through the loop of the blue strand.
- Hold the green strand and pull the knot up to the top where the flosses are knotted so it is tight. Repeat to finish the right hand knot. Note- always do the right hand knot two times for this bracelet pattern.
- Now the green strand is on the far right and the blue strand is second over from the right.
STEP 2:
- Cut 3 strands of floss 72” long and fold in half (so there are six 36 inch strands). For this tutorial we are using blue, green and yellow floss which match the video instructions. I’ll refer in the instructions to those three colors.
- Tie a knot at the folded end of all of the floss about ¾” from the fold. Scotch Tape this looped end to the table (or Safety Pin it to your jeans like my girls did).
- Tie a left hand knot using the left blue over the next green strand. Repeat. Then tie a left hand knot using the left blue over the next yellow strand. Repeat. The blue strand that had been on the left is now in the center.
STEP 3:
- Tie a right hand knot using the right blue over the next green strand. Repeat. Then tie a right hand knot using the left blue over the next yellow strand. Repeat. The blue strand that had been on the right is now in the center.
- Both blue strands are now in the middle of the 6 strands. Tie the two blue strands together in the middle of the bracelet. (You can use either a left hand or a right hand knot, it doesn’t matter). Repeat.
STEP 4:
- Repeat step 2 and 3 with each of the green strands that are on the far left and on the far right.
- When finished the 2 green strands are now in the middle of the 6 strands. Tie the two green strands together in the middle of the bracelet. Repeat.
STEP 5:
- Repeat step 4 and 5 with the yellow strands that are on the far left and on the far right.
- When finished the 2 yellow strands are now in the middle of the 6 strands. Tie the two white strands together in the middle of the bracelet. Repeat.
- Repeat his pattern until the bracelet is the desired length. Isn’t this fun?
STEP 6:
- Once your bracelet is your desired length, B=braid the three strands on the left to about 4 inches long. Tie a knot.
- Braid the three strands on the right to about 4 inches long. Tie a knot.
- Clip the ends to look neat. Not too short or they will unravel!
STEP 7:
- Put on the Chevron Macrame Friendship Bracelet, and make a wish!
