DIY Egg Carton Animals: a Fun Upcycled Easter Craft
Egg carton animals for Easter makes a fast & easy craft to pull out for kids. Bird, bunny, chick, basket…so fun and a bonus to upcycle!
Servings: 4 DIY Egg Carton Animals
Cost: $1
Equipment
- Scissors
- X-acto knife (optional)
Ingredients
- Foam egg cartons in various colors
- Construction paper, cardstock, or scrapbooking paper
- Colored markers
- Glue- tacky glue worked well
- Googly eyes
- Pom-poms (optional)
- Cotton balls (optional)
- Scissors
- X-acto knife (optional)
Instructions
- You can start by cutting apart the foam egg container so that you have some separate small egg cups to work with.I’m going to apologize right now for the sound that cutting foam makes, it’s like nails on a chalkboard! :-)Cut between the cups, and then trim off the edges of the cup, so that they are more even and not so jagged. You can use any color of egg carton cups for the following animals, but I will tell you what I used for each in the video and pictures.
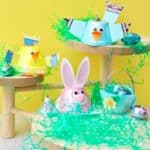
Egg carton bird
- I used a blue foam egg carton cup to make a little bluebird.In my paper stash, I had some blue designed scrapbooking paper with a little border on it. I positioned the wing tips so that they were on the edge of the paper where the border was. This is optional, it's ok if you don't have bordered paper. It is cute to use paper with printed designs if you have it though.Cut a teardrop shape for the wings and add a small tab on the end of the wing so that you can use the tab to attach it to the bird. This is very similar to the technique we used in the Toilet Paper Tube Animals post. The wings were about an inch and a half long. Fold the paper in half so that you cut two wings at the same time. Note: Always cut two at once of such things as feet, wings, or ears.I did clip the wings after I cut them out so they were a little bit straighter on the top edge.Cut a few little triangle clips into the end of the wing to make it look like there are feather tips. Fold the little flaps back, add some tacky glue, and attach them to either side of the bird. The base of the cup will be up and the flat surface of the foam cup towards the front to use for the face of the bird
- For the tail cut out a rectangle shape that’s wider on one end than the other. It’s about 2 ½ inches long with the narrow edge having some space to use as a tab to glue it onto the bird.I used the same paper with the border on it and put the border on the end of the tail to match the wings.Cut some little triangle snips out of the end of the tail to look like feathers. I went ahead and clipped some strips into the tail so that the feathers would look a little bit separated. It worked to kind of ruffle them up a bit, so they weren't all straight.Put some glue on the tab and then glue the tail to the back of the bird. Place it high enough so that the tail will slant upward and can be seen from the front of the bird.
- Cut a small rectangle out of the same paper that was used for the wings and the tail. Fold in half. Clip it into a little peaked shape, and then folded the edges so that the can be glued to the top of the birds head like a little crest. It turned out pretty cute. Later, I thought of using an X-Acto knife and making a slit in the head and just slipping that piece of paper down into the slit to stay put on the top of the birds head. I’m finding that works really well on these foam egg cups.
- Next cut out a little beak from orange paper or something that you think will work in the yellow to orange range. Fold the small piece in half and cut a triangle so that you keep the fold on one edge of the triangle. This will cause the beak to open up on the bird!Put glue on the back of the bottom part of the beak and put it in the center of the birds face. Add two googly eyes on top of the beak using two dots of tacky glue. They are such little things to get picked up. If you have trouble, just put a bit of glue on the end of a pencil and the googly eye will stick to it long enough to be put in place on the craft.Note: If you don’t have googly eyes, just cut two small round circles from white paper. Draw black circles in the centers of them for the eyeballs and then glue them on above the beak. Do this for any of the animals that we make when I mention google eyes.
Egg Carton Bunny
- I used a foam cup from a pink egg carton to make this bunny.We will start by making ears for the bunny.Cut two long, kind of narrow ovals that are about an inch and a half long and about a half of an inch wide or a bit more. Remember to add a tab onto the bottom of the ears.We are going to add pink centers to these ears. So cut two ovals that are a bit smaller than the ears. It helped me to trace one of the ears on the pink paper so I knew how big the ear was. Then I cut the oval smaller than my pencil line. So I knew they would fit on the ears. Glue these onto the front of the white ears.Use an X-Acto knife to cut a slit across the top of the egg foam carton. Be very careful, and you may want to do this for young kids, of course.Slip the tabs of the two ears down into the slit that you just made. My white paper was cardstock so the ears stood up perfectly. Note: This was a great way to add features to these cute animals- I may use an X-Acto knife to cut slits for the tabs on wings and tails too next time with big kids, we'll see.But if you have don’t have an X-Acto knife, or don’t want to use one with the children, you could just fold the tab down and glue the ears to the top of the foam cup, or use the tabs to glue the ears to the back of the foam cup.
- Next is a nose section for the bunny. Cut out an oval shape that’s about a ¾ inch long and ⅜ inches high. Draw whiskers coming out from an imaginary nose on this oval. The nose will get added in a minute.Glue the oval to the front of your foam cup. The flat section is good to use for this.I happened to have a small pink pom-pom to use for the bunny nose. So that got glued on next- right in the center of the whiskers that were drawn earlier. If you don’t have a pink pom-pom, no worries, make a small pink triangle and glue it between the whiskers instead.Glue the two googly eyes on top the oval on the front of the face.
- Glue on either a white pom-pom or a small cotton ball to glue on the back of the bunny as it’s tail.
- If you would like to add feet to the bunny as you see in the picture. Cut two 3 toed feet with a tab on the back of each each.Bend the tabs up and add glue to the front of the tabs. Tuck and glue them inside the front of the foam cup, so that they stick out from the front of the bunny.
Egg Carton Bird
- The chick is made in almost exactly the same way as the bird.I wanted to use a yellow foam cup, but didn’t have one. I've not seen yellow egg cartons lately where I live. :-). So I used a yellow permanent marker and colored a white foam cup yellow. The marker didn’t come off on my hands or anything since it was a permanent marker. I’m sure you could also use a water-based yellow marker, but I’m not sure if that will come off on your hands or not when you rub the foam cup. Let me know what you find out if you try it.
- The wings and the tail were made like the bird, but smaller. I happened to have some similar yellow checked scrapbooking paper with a border print on it. So I used that paper and made the smaller wings and the smaller tail and attached them to the chick. I did not make anything for the top of the chicks head.
- Add a smaller beak and the two googly eyes to the front of the chick.
- For fun, I made some little three toed orange feet with a tab on them and attached those like I did the bunny feet. Fold the tabs on the feet up, put a little glue to the front of the tab and tuck them under the front of the foam cup so they stick out the front.
Egg Carton Basket Favor
- This time we will use a blue foam egg cup and position it so that the opening is up. That will be the inside of our basket.Add a handle to the basket out of a narrow strip of paper. You could use a pipe cleaner for this if you wanted to. Just poke small holes in the sides of the egg cup as an easy way to insert the pipe cleaner and then bend and twist it in place.Glue the ends of the basket handle to the inside edges of the egg cup on opposite sides. I did leave the flat side of the foam cup towards the front with the handles on either side of that so that I could use the front to add some decoration
- Cut a small flower shape from paper. I cut a circle that was about a half an inch wide, and then fluted the edges, making them look like flower petals. I kind of wrinkled up the flower, so it wasn’t flat.Cut a small green leaf out of paper.Glue the leaf to the front of the basket and then the flower next to it so it slightly overlaps.Cut a small circle of a contrasting color and glue that to the center of the flower to look like it’s center area.You could make more than one flower if you’d like, or other things to put on the front of the basket. I left mine with just one flower and one leaf.A child could decorate these by drawing on them if they wanted. Or glue small items like buttons to the cups.
- Add just a tiny bit of Easter grass and three or four small Easter candies. These baskets would be very cute to place on top of the napkin on your plate as a favor for Easter dinner!
Video
Notes
If you would enjoy making these crafts alongside me then check out the full length tutorial video at: DIY Egg Carton Animals Craft for Easter Full Length Tutorial Video.