How to Make String Eggs for Easter Gifts & Decor
How to Make String Eggs for Easter gifts & décor is a fun craft. Make candy filled string eggs, a garland, or fillable Easter table decor.
Servings: 1 string Easter egg
Cost: $2
Equipment
- Bowl, spoon
- Muffin tin (something to set wet eggs on- optional)
- Scissors
- Tweezers
Ingredients
- Balloons (water balloons, larger balloons)
- String- crochet thread, embroidery thread, yarn
- White glue (or Mod Podge)
- Old paint brush
- Table covering or waxed paper/parchment paper
- Extras- Easter basket, small candy, small figurines, Easter grass, ribbon/string (optional)
- Bowl, spoon
- Muffin tin (something to set wet eggs on- optional)
- Scissors
- Tweezers
Instructions
- Put down a piece of waxed paper or parchment paper to work on. Then you can just throw away it when you’re done instead of having to scrub the countertop.Use a large bowl to put your glue mixture in. I put in probably one and a half cups of glue to start with because I was making several string eggs. You would not need that much if you’re only going to make one. And you can always add more glue if you need to.
- Blow up you balloons- small balloons for candy filled and garland, large for table decore.To put the candy into the balloon it’s best to have a round shaped candy so that it moves into the open end of the balloon more easily. I used foil wrapped chocolate candy eggs. Put the candy into the the opening of the balloon and gently roll the balloon up and over the piece of candy. I could only get two maybe three in each of my water balloons. I’m sure you might be able to get more in regular balloons.Once the candy is inside the balloon, go ahead and blow it up to the correct size.
- Unroll your string very carefully so that it doesn’t get tangled. I enrolled mine onto the floor and then transferred it into the bowl using the following instructions.If you are making the candy filled string eggs, use about 10 yards of stringIf you’re making the string eggs for a garland, use about 15 yards of string. If you are making the large string egg, use about 15 yards of string, and then continue to add more pieces of string of that length until you are done covering the balloon. Transfer it up to the bowl of glue by holding the final end that you’ve clipped, placing it in the bowl. Then gently pull the string off the floor and loop it into the bowl so that it just piles on top of itself without tangling. This is key to all of this as a tangled thread is very hard to work with.Continue to hold onto the last end of the string as you finish putting it into the bowl so it doesn’t get lost down into the mass of string and glue.
- Use a spoon to gently press the string down into the glue. Do not stir it!Take one of your balloons, and hold onto the tied end as you also hold onto the end of the string that you’ve kept in your hand. With your other hand, pull some of the string out of the bowl. As you’re pulling it out of the bowl squeeze your fingers down the string, so it pulls some of the glue off of the string. Then wrap that part around the balloon. Pull your fingers down the string to get some of the glue off the string, and then wrap that part around the balloon, repeating this until you’ve used up all the string in the bowl.This whole time you’ll work over the bowl of glue so all of the extra glue falls back down into the bowl.Keep looking at your balloon to see that the string crisscrosses it in various directions. This will hold your egg together when it’s dry, because the strands of yarn crossing over in various angles, will attach itself at these cross points.If you do not have enough string to cover the egg, then set your egg down, wash your hands, and cut another piece of string and repeat this process.
- As I finished the smaller string eggs, I set them in a muffin tin which held them while I made the other eggs and as they dried.The large egg sat up on a mason jar lid to hold it as it dried, this worked well. It helps to turn the eggs every few hours so that the air can circulate around them, but it just takes a long time. It’s important not to do the next step until they are fully dry.
- Hold the top of the egg (knotted end of the balloon) in one hand, and with the other use a pair of tweezers to reach through the holes between the strings. Push the balloon away from the dried string on the bottom of the egg first. It will probably pop quickly and that’s OK. Sometimes the deflated balloon will just pull away from the inside of the egg and you can just pull it out with the tied end of the balloon. But I had to push the balloon away from the string over and over again, and then gently reach through some of the small holes between the strings with the tweezers and pull pieces of the balloon out of the inside of the string egg.
- This is all that needs to be done with the candy filled eggs. I placed them in a small Easter basket with Easter grass, and it’s very cute.
- The eggs that I made for the garland are also ready to use. They are easy to string on a piece of yarn or string or ribbon. I used the tweezers to help me out. Stick the yarn inside a hole on the top of the egg, and then reach through another small hole with the pair of tweezers and pull the yarn on through. Tie the yarn over the top of the egg to keep it in place and then string the next egg and so forth. You could add ribbon bows to the top of the eggs if you would like, or other decorations onto the side of the egg as well.
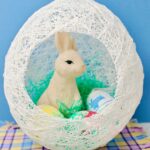
- My favorite is next, the large string egg! I drew a circle on the front of the egg and cut it out. The dried string was pretty hard to cut so you might have to help the Littles.When the hole is cut, you can either stand the egg up or lay it on its side and place decorations inside. It sits up well on a mason jar ring or you could glue a flat piece of cardboard or something similar to the bottom to use as a stand. I chose to put mine straight up and down vertically so that I could stand a little ceramic bunny inside with some Easter eggs. I put Easter grass in and then the decorations on top of it. This will be fun to use as a table decoration for Easter! You could add ribbon around the circle edge that you cut or add a bow or other decorations to the side of this egg too if you want.
Video
Notes
Tips, details about supplies and about balloons for each option are on the website full post.