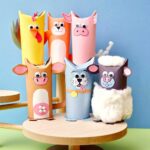
How to Make Cute Toilet Paper Roll Animals (6 Farm Animals)
Make Cute Toilet Paper Roll Animals from recycled TP rolls. 6 farm animals (cat, dog, pig, cow, lamb, chicken). An easy, inexpensive craft.
Servings: 6 farm animals
Cost: $2
Equipment
- Scissors
Ingredients
Instructions
- Lay the toilet paper roll on the construction paper so that the end of the toilet paper roll lines up with the long edge of the construction paper.Use a ruler to draw a line down the construction paper the same width as that toilet paper roll. Cut along the line with a pair of scissors.A piece of tape will help attach the end of the construction paper to the toilet paper roll and hold it in place. Then roll the paper around the cardboard tube so it’s fully covered.Cut the extra construction paper off and set it to the side. We will use it for some features on the animal.
- Next take one end of the toilet paper roll and fold down the top. This will be very clear if you watch the video. Press on one side of the toilet paper roll until it collapses inwards. Then press on the opposite side of the toilet paper roll until it presses inwards as well. Kind of pinch the two edges that are not collapsed in until they make points. I use these points for ears sometimes. But I like the way that it covers the top of the head for all of the animals so that you don’t look inside of the toilet paper roll.I will assume that you will have done this step on the top of the paper rolls for each animal that we make and have covered them in colored paper. I will mention what color I used for each farm animal as we go.There is a free printable template for you to download and use to help you in the following steps. The drawings aren't meant to be patterns but will be helpful in visualizing what pieces to make for each farm animal. Here is a link to download this free printable. Cute Toilet Paper Tube Animals Free Template
The CAT
- The faceThe pointed edges of the top of the toilet paper roll are going to be the cats ears, so I’m not going to make separate ears for it. I did draw little triangles on the sides of the tube to look like the inside of the cats little triangle ears.Cut an oval from white construction paper for the cats nose area. See the template or a picture for how to draw the nose and mouth.Glue that oval shape onto the front of your cat as part of its face. Glue it far enough down so there’s room for googly eyes.Draw small dots on either side of the oval, which are where the whiskers come out. Then draw three or four whiskers fanning out from that oval shape.I chose to use googly eyes for all of my toilet paper roll farm animals.Put two dots of glue above the oval, and then press the googly eyes on. I glued on two medium sized googly eyes (large googly eyes would be cute too).If you do not have googly eyes, you can use two small round pieces of white paper to glue on as eyes. Then you can just draw on black circles for the pupils.Another option is to just draw two circles for the eyes. You can also add eyelashes if you want or other decorations to the eyes.I chose to put a white tummy on my cat. This is optional.Cut a rectangle shape from your white paper and check it against the size of the tube to see if it’s the size that you like. Cut it down until it is.Then, round off the top of the rectangle to be the top of the tummy. Glue this on the front of your cat.Our cat's tail will be cut from the same color paper that you made your cat.Draw a narrow tail that curves upward on the end. Draw a small rectangle on the end as a tab. This is where you place the glue and attach it to the cat.Put a little glue on that tab area and then glue it to the back of the cat. I like how you can see it from the front of the cat.We’re going to make feet for our cat. This is optional. We will repeat this step for each animal that we make and it is always optional. The feet will look a little different on each animal, but it’s the same process. So I won’t repeat this in the directions for each animal.Set the bottom of your toilet paper tube down onto a scrap of the orange construction paper. Draw around the toilet paper tube with a pencil.Then draw two cat paws on the front of that circle. See the template.Cut this out, but leave just a little bit of extra paper around your circle for the glue we'll put on top of your pencil line.Put a line of glue around the circular pencil line, then set the bottom of your toilet paper tube down into that glue and let it sit until it’s dried.
The DOG
- Light blue construction paper covers my dog. We had a blue heeler and I didn’t have any gray construction paper. I thought blue was a good choice.I used the little pointed areas on the top of the head for the dogs ears. You could add longer ears, or drooping ears if you would like.Look at the template for how I drew the nose of the dog. Draw this on white paper and cut it out. Use a black marker to draw on the nose and the mouth. Cut out a small pink tongue from construction paper. Look at the template to see the shape. I drew a little black line down the center of the tongue. Glue the nose and the tongue onto the front of the dog leaving room for the googly eyes. Draw on the small dots and fan out whiskers like we did on the cat.Add your googly eyes above the nose.We always had a collar on our dog so I cut a piece of brown construction paper and put it around the tube right underneath that nose area. Add a small yellow construction paper circle to look like the a metal tag. If you would like to, and can write small enough, you could write the name of your dog on the collar tag.Make a tail for the dog. Glue it onto the back of the TP tube. Then complete the dogs feet as we did for the cat, making the same paw shapes. Add glue on the round pencil line and set the bottom of the tube down on it.If you would like to add a tummy on your dog of white paper, you may do that. I chose not to.
The PIG
- Making the toilet paper roll pig was fun. I covered my toilet paper tube in pink construction paper. I made the nose and ears from a darker pink construction paper. See the template for their shape.Draw the nose in an oval shape with a slight dent up on the bottom side of the oval. Draw two circles for the nostrils of the pig. Glue the nose onto the front of the pigs face, leaving room for the googly eyes.Glue on your googly eyesThe pig ears are a different shape than any of the other animals. Look at the template and draw the ear with its tab. I think I’ll use the same shape for an elf if I make one in the future. Fold your paper in half to cut two matching ears at the same time. Fold the tabs back and put some glue on the tab. Then glue the ears on- one on each side of the pigs head. You might have to hold those for a second so that the glue sticks.Our last fun thing on a pig is a curly tail. I used half of a white pipe cleaner.Curl it up the way that you would like, and then curl a tight circle on one end of the tail. You'll use this to glue it to the back of the pig.Put some glue on the back of the pig and then put that small twisted circle into the glue. Hold it for a while until it sticks well. When it’s dry, you can bend that tail the way that you like it. I bent mine so that it kind of moved to the side so I could see it from the front of the pig.Make your feet for your pig the same that way that we did on the cat. But for the pig will make some small pointy hooves instead of paws. See the template for the shape. Draw with black marker on the end to make it look like it has little hooves.Glue your feet on the bottom of your pig and you are done!
The COW
- Making the toilet paper roll pig was fun. I covered my toilet paper tube in pink construction paper. I made the nose and ears from a darker pink construction paper. See the template for their shape.Draw the nose in an oval shape with a slight dent up on the bottom side of the oval. Draw two circles for the nostrils of the pig. Glue the nose onto the front of the pigs face, leaving room for the googly eyes.Glue on your googly eyesThe pig ears are a different shape than any of the other animals. Look at the template and draw the ear with its tab. I think I’ll use the same shape for an elf if I make one in the future. Fold your paper in half to cut two matching ears at the same time. Fold the tabs back and put some glue on the tab. Then glue the ears on- one on each side of the pigs head. You might have to hold those for a second so that the glue sticks.Our last fun thing on a pig is a curly tail. I used half of a white pipe cleaner.Curl it up the way that you would like, and then curl a tight circle on one end of the tail. You'll use this to glue it to the back of the pig.Put some glue on the back of the pig and then put that small twisted circle into the glue. Hold it for a while until it sticks well. When it’s dry, you can bend that tail the way that you like it. I bent mine so that it kind of moved to the side so I could see it from the front of the pig.Make your feet for your pig the same that way that we did on the cat. But for the pig will make some small pointy hooves instead of paws. See the template for the shape. Draw with black marker on the end to make it look like it has little hooves.Glue your feet on the bottom of your pig and you are done!
The LAMB
- The lamb was fun to make, and a little bit different. I covered my lamb in black construction paper.Make the nose out of white construction paper. Cut out a small pink oval which will be the lambs pink nose. Glue the nose to the top of the white oval. Draw two slanted nostrils and a mouth. Look at the template as a guide. Glue this nose area to the front of the lambs face leaving room for the googly eyes on top.Glue on your googly eyes next.The lambs ears are similar to the cows, but not quite as large. See the template. I glued on two small pink ovals to look like the inside of the lambs ears.Glue your ears to the lamb, one on each side of its head.Now, for the fun part, we’re going to add the lambs wool! Use cotton balls for this. My cotton balls were quite large, so I didn’t need very many of them but small ones will work as well.Kind of stretch the cotton balls out so they’re a little bit flatter and not quite so thick. Put glue on the body of your sheep and press the cotton balls into the glue. Keep adding them until it’s covered the way that you would like it to be. Isn’t that cute?I did add one small puff of cotton ball to the top of the lambs head and I thought that was a great touch.I did not add a tail to my lamb. (Does this mean the lamb can't go home, "wagging its tail behind him?)Lastly, make feet for your lamb. The lambs hooves are quite similar to the pigs hooves, so I use that same basic shape. See the template. Glue this onto the bottom of the tube and you are done with the lamb!
The CHICKEN
- Lastly, we’re doing a chicken! I think it’s my favorite of all of them. So I’m glad it was last. I covered my chicken in yellow construction paper.For the nose, fold a small piece of orange construction paper in half and cut a triangle with one edge being on the fold. It's all in one piece and opens like a beak (a diamond shape- see the template).Make the small red waddle or hangy-down part that goes below the beak out of red construction paper. See the template for the shape.Practice positioning these on the front of the chickens face, so you know how you want them placed. Then glue them onto the front of the face with the red waddle first, and then the orange beak kind of on top of it or next to it. Make sure you leave room for those googly eyes.Glue the googly eyes on next.We’re going to make the red comb that goes over the top of the chickens head.You can watch the video to see how this is done.Look at the template to see how the comb looks. It's a zigzag line on top that kind of looks like mountains. Its about an inch and a half long or two inches long. You need a small tab area on the bottom so you can glue it onto the chickens head. You’re going to cut that out and then fold the tab.Practice positioning it so that you can put it on from above the googly eyes area and up and over the head. You will have to make a slit where it bends from the front of the tube to the top of the tube. Then you’ll have to cut another slit where it bends from the top of the head down the back of the tube. When you have it the way you like, put glue on the tab and glue it onto your chicken.Next, we’re going to make the tail feathers. Look at the template and see the shape. I stacked four different colors of construction paper on top of one another and drew this feather shape on the top one. Then I cut them all out together. Basically it’s a tab with three feathers on top of it that are about 2 ½ inches long.Cut those out. Make a slit down between each feather almost to the tab area, so that the feathers can kind of be separate from one another.Practice fanning these tail feathers out till you like it. Then glue them to one another on the tab area.Bend the tab back.I kind of bent my feathers so they had a curved shape to them before they're glued onto the chicken.Put some glue on the tab. Then glue the tail to the back of the chicken. I had to hold the tail there for a number of seconds until the glue set.Once it’s dried well, you can kind of keep working with the feathers. Curve and bend them till it looks like a plumed chicken tail.Lastly, you will make the feet for the chicken. The chickens feet are like birds feet with three pointed toes on each one. See the template.Glue these onto the bottom of the tube and let the chicken sit until it’s well dried. There's your chicken!
Video
Notes
Note: the time given is per animal, it will take longer to make all 6 of the farm animals
Prepare each toilet paper tube as instructed at the first of the post. Choose whatever color of paper you would like for your farm animals.