4 Adorable & Easy Paper Penguin Crafts for Kids
4 Adorable & Easy Paper Penguin Crafts provides a party of penguins to make by every age kids (or adults). Paper and googly eyes fun.
Servings: 4 paper penguins
Cost: $2
Equipment
- Scissors
Ingredients
- Black construction paper or cardstock
- White construction paper, cardstock, or copy paper
- White doily- optional
- Orange construction paper or cardstock
- Google eyes
- White pencil
- Scissors
- Glue sticks
- Items and paper to use for decoration- optional
Instructions
Penguin 1
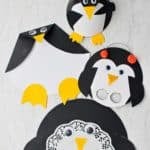
- The first adorable and easy paper penguin that we will be making is a simple round flat paper penguin. I made mine out of black and white card stock, but any black and white papers would work for the main part of our penguins.Grab a few items from your kitchen to be able to trace the round shapes that we will need for circle patterns. I used a plate and a cereal bowl- they worked really well. You might also want to grab a mug, a glass, and your measuring cups for smaller sized circles.Take a black sheet of construction paper or card stock and use a white pencil to trace a circle on your paper. I found a mixing bowl that was the right size to use as a pattern. Trace this circle towards the bottom of the paper so that you have as much left over as possible to use later for the wings.Go ahead and cut out your circle on the white line and lay it in front of you.I used a white doily to be the white stomach of this large penguin and it looks really cute. It looks like he’s wearing a tuxedo and ready to head off to that party I mentioned earlier.You can cut a round circle on white copy paper, using a cereal bowl to make the tummy section of the penguin if you don’t have a doily.Use a glue stick to glue the white tummy shape onto your penguin at the bottom center of the black paper circle.Use the remaining part of your black paper to cut wings for the penguin. Use something that’s about the size of a mug as a pattern for the wings. There are two ways to cut the wings. You can either trace a full circle on black paper and cut it out. Then fold it in half and cut along the fold. OR you can fold your paper in half and draw a half circle on the edge of the paper. Then cut out two half circles at once on the folded paper. You will use this same technique on a couple of the other penguins.Glue the two wings onto the penguin- one on either side. I placed the flat line of the half circle towards the penguin and the round sides outward. You can arrange the wing anyway you would like. The penguin can look like it’s waving or it can look as if it’s wings are straight down to its side.Take a piece of orange construction paper or card stock and cut 2 penguin feet. Fold your paper in half so you’re making two identical feet at the same time. Cut a square that’s about 2“ x 2“ and then make that square into a semi-circle. On the flat edge of the semi-circle cut triangles into the paper so that the foot has three pointy toes. Now you have two identical feet! Glue these feet onto the bottom of the penguin. Go ahead and cut a triangle nose for the penguin’s beak. Mine is about one and a half inches long and about 1 inch wide at the top.Glue the beak onto the penguin (on the white area) so that the triangle points downwards so it looks like a beak.Lastly, glue on large googly eyes above the beak, but still on the white paper. This is a white faced penguin! There are some penguins that have black faces, so it’s OK if you glue your eyes above the white stomach area as well.Now we have the first variation of our adorable and easy paper penguin crafts!
Penguin 2
- Our second adorable and easy paper penguin craft is a variation of the first one.Using the mixing bowl as your pattern again, cut one black circle from paper. Draw a second circle the same size from white paper and cut it out.Glue these two circles together, back-to-back. The white circle is going to be the penguin’s tummy and the black will be its back of course.With the white side up, fold about one fourth of the circle on the right side inward (or downward).Then fold about ¼ of the circle inward from the left-hand side so that it makes a triangle at the top of the penguin.These folded down areas are the two wings of the penguin.Now fold the triangle at the top of the penguin downwards so that it is about 2 ½ to 3 inches down.This is the face of your penguin and where you’re going to place the googly eyes and the beak!Now using your orange paper, cut a triangle that’s about one and a half inches long and about 1 inch wide for the beak.Glue the triangle to the end of the pointed face that you just folded down.Then go ahead and glue the large googly eyes above the beak on that same face area. Isn’t that cute?All you need now is to cut 2 feet for your penguin. He needs feet to dance at the party you know.Fold orange paper so that you’re cutting 2 feet that will be identical in size. Cut a semi-circle from the paper like you did for penguin variation one. Then on the flat edge, cut in triangle shapes to make a three toed foot or you can cut little scooped areas to make it look more like a webbed foot if you would like. If that doesn’t make sense, you can see what I mean in the video.Glue these 2 feet to the bottom of your penguin, and that’s it! You are done with the second variation of our adorable and easy paper, penguin crafts!I noticed after I was done with the video that if you fold the bottom fourth of the penguin upwards, the penguin will stand up with its feet coming out in front of it. Cute! You’ll notice that at the end of the video.
Penguin 3
- Let’s make our third adorable and easy paper penguin craft. The party of Penguins is growing!Our third penguin looks very much like the first penguin, but it’s smaller in size and we’re going to make it into a finger puppet.Cut a black circle of paper, using the cereal bowl as your pattern. You can make this smaller if you want to for younger children by using a smaller sized glass or a mug for a pattern. Cut out your black circle.Now make a tummy for your penguin by using that same cereal bowl to draw the pattern on white paper and cutting the circle smaller. You could also find a smaller circle item to use as a pattern. You could also make a kind of a heart-shaped tummy and glue it on. You will see this option in the video. It’s a cute variation on these penguins. Glue that stomach area onto your penguin.Go ahead and cut wings for your penguin using something that is a smaller circle as a pattern, such as a measuring cup. Cut this out and cut it in half. Or you can fold your black paper and draw a half circle with your pattern and cut two out at the same time.Glue your wings on either side of your penguin. Next cut out a beak for your penguin. This time I folded my orange paper in half and cut the triangle with the top of the triangle beak on the fold line. After it’s cut out, then the beak hinges on the fold and looks like it’s opening! This is another cute variation.Glue the beak on the white section of your penguin at about the center point of the whole penguinGlue two googly eyes above the beak, still on the white section. If you’ve used the heart design for your stomach, it looks cute to have one eye kind of in each of the top parts of the heart shape.Lastly, you’re going to cut two holes towards the bottom of the penguin instead of gluing on paper feet. You will use these two holes to put your fingers through to use the penguin as a finger puppet.I used a googly eye to trace around as a pattern for the two finger hole lines. But you could maybe use a nickel or a small bottle cap as a pattern as well.Draw around your small round item 2 times at the bottom of the penguin. Leave at least a quarter inch between the two circles and at least a quarter inch from the bottom edge of the penguin. This next step is something you will need to help Littles with.Poke a hole through the center of each of the finger holes using a hole punch, a sharp object or just the point of your scissors. Be very careful not to poke your own fingers.Then go ahead and cut out the two finger holes. This is the most difficult step of the entire craft that we’re making. So be sure to help kids that have less developed cutting skills.Put two fingers through the holes from the back of the puppet, and now you have a penguin finger puppet!This is our third variation of our adorable and easy paper penguin’s craft!
Penguin 4
- Ready to make the last variation of our four adorable easy paper penguin crafts? This one is a little bit different. We’re going to make a 3D cone shape.For this paper penguin you will need a half circle of black paper.Use a plate to draw a half circle on the edge of your black paper. If you want to make two of these penguins, you could draw the full circle and then cut it in half if you prefer.While the half circle is still flat, add the white tummy section of the penguin. You can either make another heart-shaped white piece of copy paper or make a semi-circle of white paper that is going to be about three fourths of the way up the circle. You will place it on the paper with the round edge being the bottom of the penguin. The stomach will be along the center of that round edge.Glue the tummy shape down onto the black semi-circle paper. Let this dry well before going onto the next step.Take your half circle of black paper and twist it into a cone. If this doesn’t make sense, the video will make this step clear!Use a stapler or glue to hold the cone in its shape.This is going to be the body of the penguin, and it will sit up on the table. I thought it would rock, but mine didn't very much.In this next step, you are going to flatten the top part of the cone between your fingers and then fold it down about one and a half inches to make the face of the penguin. This is similar to penguin variation number two. Note: You do not press the entire penguin flat, just the top 1 ½ inch.Go ahead and cut an orange triangle for the beak and glue it onto the point of the penguin face.Then glue googly eyes above the beak, on this triangle section that you folded down. There you have the face of the penguin. Looks like he’s looking at you, doesn’t it? :-) I think he’s inviting you to the penguin party!!Cut two wings using a smaller circle pattern again, like a smaller, measuring cup, or a smaller glass. Either cut a circle from the black paper and cut it in half to have two semi circles or fold your black paper in half and draw a half circle with your pattern and cut the two pieces out one timeGlue the wings on either side of the penguins white tummy area. Remember, you can make them go any direction. I made one of mine up kind of waving this time!It would be cute to glue something into his wing “hand” like a paper candy cane or a little sign with someone’s name on itThe last thing is to cut out 2 feet. Make the feet just a bit longer so that you can fold up about a half inch on the top part of the foot and glue it on the inside of the cone. This will leave the feet sticking out of the bottom of the cone, and it looks like he’s standing on the table!This is our fourth and final fun penguin craft.Now you have a whole party of penguins that you’ve made.
Video
Notes
you can decorate your penguins in any way that you would like! A great addition is a cut out paper hat, gloves, and scarf. Glue them on and make it your very own penguin with a personality.
I used two puff balls and a paper clip that I opened up to glue onto the top of my little penguin. It looks like he has on earmuffs!
Think of using things like pipe cleaners, popsicle craft sticks, pom pom, and little found objects. So much fun.