Indoor Scavenger Hunt with Free Printable Cue Cards
An Indoor Scavenger Hunt with Free Printable Clue Cards and directions makes game set up easy. Great indoor fun for New Years & cold weather!
Servings: 1 Scavenger Hunt Game
Cost: $1
Equipment
- Scissors
Ingredients
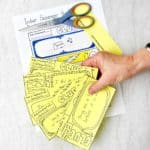
- Copy of the Indoor Scavenger Hunt Free Printable Clue Cards (on colored paper)
- Pen or markers
- Piece of scratch paper
- Scissors
- Tape (to attach clues if needed)
- Treat, activity for end of scavenger hunt (optional)
Instructions
- First things first.It’s always lots of fun to think about what is at the end of your scavenger hunt so you can bring some excitement into the activity. What would you like to have or do at the end of your scavenger hunt? It’s fun to have treats of some sort- candy, or cupcakes for example. But if you’re like us, you are probably “sweet-ed out” after Christmas!So you could also have an activity waiting for them at the end of the scavenger hunt- fun things like a chance for them to jump in the car and go with you to do something special. Remember, they don't need to add additional cost, kids love quality time with you.Ideas on the website.
- The next thing to think about is what are the locations in your house that will be good stopping spots on this scavenger hunt? Perhaps you have a piano, an unusual chair, or a fireplace. Or the location can be a simple thing like the washing machine, the bathtub, the child’s bedroom, or the front door for instance.You can make it harder for older kids by making the location a bit more difficult to figure out. Like more specific household items- a painting, something in a cupboard, or behind the couch.So take a few minutes right now to make your list of locations. Write them down on a piece of paper, you will need to work with them a bit so you can’t do this in your head.For younger children (age 4-6) choose 5-6 locations. Consider 7-8 locations for kids ages 7-10. 10 locations might be good for older kids. You know your kids so adjust this to fit.Next, put these locations in order. Number your locations so that the kids need to zig-zag back-and-forth through the house so it’s not easy and convenient. Don’t put them in an organized, straight-line order! This increases the fun. Lastly decide on the starting place for your scavenger hunt. This is where you will hand them their clues. Place this at the top of your list (before location #1) and label it as the starting place.Note: The last location will also be the place where you place the treats or treasure you decided on earlier.With your list in hand we will add the locations to our clue cards!!
- I’ve made a template for you to help make this indoor scavenger hunt easy to put together.I always get a little mixed up in my head about how to do a scavenger hunt. Like how do I make the clues, so they’ll be in the right order and get the kids to the right spot at the end? And then how do I make sure I hide the clues in the right spots?The Free Printable Clue Cards makes this slam dunk easy! (These are for your personal use only please.)Download files and print off the Indoor Scavenger Hunt with Free Printable Clues (this is the link). Print the clues off on colored paper. There are 5 clues in my free template. Page one has two clues. You only need one copy of this page. This is the first card you give at the starting place and one Clue Card.Page two has 3 Clue Cards. Make extra copies of page number two to have enough Clue Cards for your game.
- We are going to write our locations on the cards first and then create the clues.The first Card on page one is given out at the starting spot. It is labeled “Starting Clue” and will have the CLUE for location #1. You will keep this clue with you.The second Card on page one says “Hide at location #1”- write on the blank in the upper left corner what location #1 is (for example- the stove). This card will have the CLUE for location #2.On the top Clue Card on page two where it says “Hide in location #__”- write #2 and what that location is from your list. This card will have the CLUE for location #3- so write #3 in the blank.On the middle Clue Card on page two where it says “Hide in Location __”- write #3 and what that location is from your list. This card will have the CLUE for location #4- so write #4 in the blank.On the bottom Clue Card on page two where it says “Hide in location #__” - write #4 in the blank. and what that location is from your list. This card will have the CLUE for location 5- write #5 in the blank.Repeat this pattern until all of your Clue Cards are numbered and have the locations written in. Don’t stop to do anything else until you are done- or you will get mixed up. (Ask me how I know this! Ha!)So if have 10 locations for the kids to go on their scavenger hunt. You’ll have a starting spot card and a series of 10 additional Clue Cards for a total of 11 cards.
- Now that you have all of the places written in, you’re going to come back and write clues. Write with pen or markers in the blank space provided.Your starting spot is going to have a clue that takes them to your first location that the kids need to find. Write a little clue about location #1. It does not have to rhyme but should give them a hint where they’re supposed to go without telling them directly where it is. So, for instance, my starting place could be the kitchen. That is where I will hand them the Starting Clue that I keep with me. My location #1 is my piano. Perhaps my clue could be- “Sing me a tune- it would put me over the moon!” That’s if I want it to rhyme. Otherwise, I could just say- “Head some place where you can play me a tune.” NOTE- Draw a little picture for the younger kids that can’t read yet. Do the best you can at drawing, or you could print a picture of a piano from the internet if you prefer and glue it on the clue card.The next clue card says, “CLUE for location #2”. Write a little clue about location #2. Let’s say the second location is going to be the bathtub. You could say, “Rub a dub dub, three men in a ___.” Or if you don’t want it to rhyme it could just say- “This always helps you get squeaky clean!” All right so the next Clue Card is going to have a clue that takes you to location number three. Keep writing your clues until you have filled each Clue Card appropriately.Don’t get too hung up on the clues- just have fun with it!
- So now you just are going to need to place your clues in the right locations. Cut your clues apart on the solid lines. It is easiest if you keep them in order, but this works even if they get out of order! No worries.You will keep your starting clue and put it in your pocket. Then take each CLUE card and hide it in the location you wrote in the upper left corner of the card. For instance, in my example my location is #1- piano. I wrote “Hide at location #1- the piano” in the box in the upper left hand corner of the clue card. Don’t make the clue too obvious. Hide it just a little bit. I might hide my clue behind the little stand that holds the music on the piano for example. It might be good to tape them in place. Then take your second location clue and go there to hide the clue. In my example that was the bathtub. So go into the bathroom and tape it on the wall of the tub above the water handle for example. Again don’t make it too obvious. You’ll continue this until you have all the Clue Cards hidden in their location, including the final clue.Finally, put the prize, craft kit, or even just a congratulations note at the last location along with the clue you put there. Now all that you will still have in your hand (or in your pocket) is your starting clue. All the rest are in the correct locations.
- When the time is right, gather the kids, explain the scavenger hunt to them and give them the Starting Clue from your pocket and let the fun begin!!Let me know how your scavenger hunt turns out. My grandkids love these and we have them fairly regularly. We do them outside when the weather is nice, and we’ve done them as inside activities as well.
Video
Notes
Every once in a while, will have little activities at each of the clue places. The activity may be a little puzzle or a coloring sheet or something just for fun. They’ll complete those as they go. But usually they’re so excited it’s hard to spend that time at each clue location :-)
More ideas on how to adapt the scavenger hunt are found on the website!
https://WelcomeToNanas.com