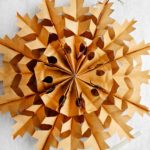
How to Make an Easy DIY Snowflake out of Paper Bags
Learn How to Make a Snowflake Out of Paper Bags for a large, showy winter decoration for Christmas. Can use either white or brown paper bags
Servings: 1 Snowflake out of paper bags
Cost: $1
Equipment
- Hot glue gun and hot glue
- Good Scissors
- Hole punch
- Stapler (optional)
Ingredients
- Brown paper lunch bags or white paper lunch bags
- Easy DIY Snowflake Out of Paper Bags Free Pattern
- String, twine, or fishing line
- Ribbon (optional)
- Hole reinforcers (optional)
- Glue stick (optional)
Instructions
- I have made a printable with snowflake pattern ideas that you can use. There are six different patterns there and I know you will come up with many more of your own!Free pattern found here: How to Make Easy DIY Snowflake from Paper Bags Free Pattern.
- Lay the first bag down in front of you with the bottom fold closest to you, the opening of the bag at the top, and the flat unfolded side upward.You can either freehand draw the pattern on the first bag or you can try enlarging this pattern template to a size that would fit on the side of the bag.Go ahead and draw your pattern on the top of the first bag. Remember that you need to leave uncut areas on the sides of the bags so the snowflake holds together. So draw a design that doesn't cut off the entire side of the paper bag.You will use this as a template to cut the rest of the bags. Set this bag to the side for a minute.
- Take one of the bags and set it in front of you with the folded bottom edge closest to you and the flat unfolded side upward. Take your hot glue gun and place a strip of glue down the center of the bag (from the top of the paper bag to the bottom of the bag) and then sideways from one side to the other along the bottom edge. You’re making an upside-down “T” with these two glue lines.Set the next bag on top (second bag), and they will be glued together, of course. Tip: Be sure to set each bag on top with the folded edge closest to you and the flat side on top (folded bottom area is underneath). This makes your snowflake unfold correctly and look symmetrical.Make a hot glue “T” on the top bag and set the bag you drew your design on top next. This makes a stack of three bags.
- Using good scissors, go ahead and cut out the design you drew on the first bag. Cut through all the three bags you have glued together.Glue three more individual bags together. Then glue the first set of bags on top.Cut the second set of three bags using the first set as a template.Glue the last two bags together. Glue the set of six bags on top.Then cut the last two bags using the other bags as a template.At the end, you’ll have a stack of eight bags one on top of the other glued together and cut in the same shape.
- Drum roll- the next step is the fun part!! It is SO FUN to open up your giant snowflakes, especially the first time!Take your stacked bags that are glued together. Hold the top open end of the bag of the front bag and the back bag. Gently pull them around toward each other. This will open your snowflake into its full large shape.
- We need to think about how we want to hang these bags up. To hang these DIY paper bag snowflakes you can use string, a piece of twine, or fishing line. Cut a piece of string that’s about 8 to 12 inches long and set it to the side.You can use a line of glue to hot glue the surfaces of these two bags together if you want. But it may be easier to use a glue stick or a stapler for this step to avoid the heat of the hot glue when connecting the last two bags. Tip: Staples can be removed later so you can use the easy paper bag snowflakes again next year.Then you’re going to use a hole punch to punch a hole in the top of the bag. If you don’t have a hole punch, very carefully make a small hole with a scissors.I used some of the little hole reinforcers that are for notebook paper and applied them on both sides of the bag around the hole I’d punched. I’d like it to last quite a while, and I don’t want to get pulled out and rip too easily. This is an optional step.Then just take your string, go through the hole and tie the two string ends together. If you have a taller ceiling you can cut the string longer as needed for where you want to hang your snowflake.Tip: You can hot glue a ribbon on the last sides of the bags, fold them up, and use that to hang the bags. Or use a little hot glue on these ribbons and then peel that off after the season. Fold the bags up and use them again.Now you can hang your snowflake!
Video
Notes
I would suggest starting with something simple, especially if you’re doing this with young children (like cutting triangles out of the side of the bag). You can graduate to something more complicated using different shapes after you’ve made one that’s easy first.