Easy How to Paint Aspens in Watercolor
This Easy How to Paint Aspen Trees in Watercolor step by step tutorial makes it possible to create your own aspen tree painting. Gotta try it!
Servings: 1 aspen painting
Cost: $5
Equipment
- Variety of watercolor brushes
- Cup or jar (for water)
Ingredients
- Photograph of Aspen trees
- Watercolor paper
- Prang Watercolor paints or other tube watercolor paints (and pallet)
- Ultra-Fine Point Sharpie Permanent Marker
- Pencil
- Eraser
Instructions
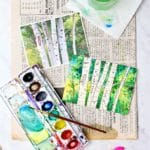
- Let’s start by getting our paper ready. My painting will be used as a card (I’m making thank you cards for our kids for the trip). So I cut a piece of watercolor paper to 8 ½ x5 ½ inches in size. It folds in half to be 4 ¼ x5 ½ inches in size for a card. What you see in the picture has been folded in half already.You can also draw a rectangle on your paper in the size you would like for a small painting. I suggest a 5x7 inch size which could easily be framed if you want. You could also do an 8x10 inch size. Just remember to increase the size of what I do in the tutorial to fit your larger paper size.
- We’re going to start by drawing the tree trunks. They go from the top of the picture to the bottom of the picture. It takes two lines to draw each tree of course.Notice that the trees are not exactly smooth and so the lines you draw are not going to be exactly straight. That’s cool, it’s fun to draw not straight lines!! ;-)Use a pencil to draw each tree from the top to the bottom of the paper. Notice that the tree in the center slants. That would be a good tree to draw first.The tree to the left of it is pretty straight up and down but is just a little bit behind the slanted tree. So of the two lines, the one on the right of the two will stop where it goes behind the slanted tree.The next tree to the left and the one to the right of the slanted one are fairly straight up and down. The last tree to the right is narrower and kind of slanted.Draw the little branch that slants off the fourth tree that goes behind the last small tree on the right. See how the line stops and then starts again after going behind that small tree? The branch gets smaller as it gets farther away from the trunk of the tree.Do you like how the lines look? If not, now is the time to erase them and try again until you are happy. Don’t overthink it. They don’t have to be perfectly like the picture.I added the little twig you see to the far left of the trees.
- When the lines are the way you want them, go over them with the Fine-line Sharpie permanent marker. You will be painting over these lines, they won’t smear.
- Now let’s add the little lines that go across the trunks. They won’t look exactly like the picture, it’s to give the effect. With a pencil draw a variety of short lines on each tree trunk in pencil.Add a few of the words on the tree if you want. If you notice I didn’t even put them on the same place on the trees. (I had to have “MOM” on there!)Draw a few small circles to look like knobs and notches. The larger knob is a long squiggly line oval with a smaller oval inside. What do you think? Erase and correct until you are happy with how it looks to you. Remember, don’t overthink, and don’t try to make it exactly like the picture. You are looking for an effect, for the overall look of aspen trees.Go over these pencil lines with the fine line Sharpie.
- Use your medium round watercolor paint brush to “paint” clear water on the spaces between the trees you have drawn. You want the paper to be wet and you’ll be able to see the shine of the water. But you don’t want the water to puddle up and run off the paper.
- We are going to start adding paint into these areas. This is called a watercolor wash. It will add a general color into the background. Then we will add layers of color on top of this with more details.Look at the picture of the aspen trees and notice the main background colors. There is a gold undertone in the bottom two-thirds of the painting and green towards the top. Look at the first step of the painting I did. You will paint the background in a similar manner.Put water on your brush and brush it in the yellow paint. Then brush the yellow paint into the watery areas on the lower part of the paper. Clean your brush and do the same with the green, brushing it into the watery areas on the top part of the paper. Leave a bit of white spaces towards the top where we will add some blue in a later step. Try not to get it on the trunks if you can but don’t worry if it does a bit.The paint runs and settles into the water- this is the wash effect I told you about earlier.Use some more green paint and dab it into the water in the parts of the picture where you see in the picture that the green foliage is darker. This time these are not brush strokes; they are touches of the point of the brush down into the wet surface. This will be darker but still kind of spread out in blobs. Next you will be mixing some colors to add into the wash. Put some of the green paint in the lid of your paint box and add a bit of brown into it. Dab this color into some of the areas of the aspen pictures that are the darker areas.Repeat that again, adding green and some brownish-green dabs into the darkest areas of the picture. This adds another layer of color in your painting.Then mix some green with a bit of blue in the lid of your paint box. Dab that color into your painting in the areas that you see the dark leaves most clearly and the grass towards the bottom right. Use this same color first and then secondly some of the brownish-green color to make a few grass strokes up from the bottom of the painting.Notice how the colors I mixed aren’t exactly like those in the painting? But they give the effect of what the aspen picture background looks like. The boxed colors are kind of limited so don’t let that discourage you. Add more dabs of an even more bluish-green mix of paint to the very darkest parts of the leafy areas and grass. Doesn’t that add shadowy depth to the painting?Clean your brush and take a little light-blue paint and add that into those white areas you left without green in the early wash. This is the sky areas between the upper branches.At this point you can add more layers of color if you want to or be finished. Remember, this is an experiment version of your painting so don’t be critical, enjoy the process.Take a time out to let the background paint dry before going on. Watercolor paint doesn’t spread when it is dry.
- Add water to the trunk areas just like you did the background earlier.Brush a little of the brown paint on the outside edges of the wet aspen trunks. These trunks will not be a solid brown like we often think of tree trunks being. They are almost white with just a bit of color along the edges. I also brushed in just a very little bit of blue in the areas that have a shadow on the trunks.Dab a bit of the brown color on the knobs and notches that you drew. Also brush just a little brown over the words cut into the bark.Let that dry. Then add a bit more darker brown over the larger oval knot. And you may dab a bit more brown on other small knots as well if you want.
- Good job! You did it!!Now that you have tried it once, the second time is so much easier as you know what to expect. Try adding a bit more water to the wash or lighter or darker paint on different layers. You will feel more comfortable the second time you give the Easy How to Paint Aspen Trees in Watercolor a try.