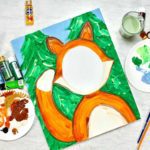
DIY Photo Frame Prop for Woodland Theme Party
Make a DIY Photo Frame Prop for a Woodland Theme Party from an art canvas. So guests get pictures of themselves as a woodland deer or fox.
Servings: 1 Photo Frame Prop (deer or fox)
Cost: $6
Equipment
- Exacto knife
- Scissors
Ingredients
- 16x20 inch Stretched Canvas (Craft stores sell these ½ price regularly)
- Acrylic Craft Paints Fox needs Orange, White, Brown, Dark Green, Yellow Green, Sky Blue; Deer needs Dark brown, Medium Brown, Skin tone/beige, Dark green, Yellow green, Sky blue, Black
- Foam plates to use as a paint pallet
- ¾ inch flat paint brush (the paint set linked above includes brushes)
- Free Printable Pattern for the DIY Photo Frame Prop FOX and DEER
Instructions
- Use the Free Printable Pattern for the DIY Photo Frame Prop FOX and DEER.I drew the pictures onto the canvas freehand and if you like freehand drawing, you can do the same.But if you would prefer, you can lightly sketch a grid onto your canvas and transfer the drawing using the pattern that is also on a grid. Using pencil, draw a 4x4 inch grid on your canvas. Number the squares the way I numbered the squares on the pattern. Then draw the lines from square one of my pattern onto your canvas into square one. Continue drawing each square until you have done all 20 squares. With just a bit of correcting on your lines, your drawing of the fox or the deer will be complete. Cool technique, huh?
- For the fox photo frame prop:Paints onto a plate-Squirt out a quarter sized amount of orange, white, and brown paint onto one plate.Squirt out a quarter sized amount of blue, and two shades of green onto a second plate.Mix a little orange into some brown and paint the outer part of both ears.Add a little more orange into this color and paint the second part of both ears.Then add in even more orange and paint the inner part of the ear.Wash your brush out in a container of water and dab it on a paper towel to dry it out some. Do this whenever you make major color changes.The upper part of the head, the lower part of the tail and the outer part of the body are all painted orange.Mix a little brown paint from the plate into some of the orange paint and then kind of brush it along the outer edge of the head, body, and tail. Don’t add more paint but go back and kind of blend it in with another stroke or two around the edges. This will make the fox look like it has a bit of shadow and dimension. The lower part of the head, the tip of the tail, and the tummy of the fox are painted white.Use a very little bit of the orange paint or some of the brownish/orange paint you mixed previously to blend along the outside of the tail and lower part of the fox’s face. This is to get that shadowed look we did before on the orange.Note: Don’t be a perfectionist on this shadow blending. It is just to give a hint of shadowing and isn’t an “exact” technique. If you really don’t like the look, go back and paint over it with the original color and try again or leave it off.Specific painting instructions for the fox Add some shading
- Painting instructions for the deerIn the video I used the same paint plates as the fox and just added a couple paint colors (dark brown, beige, and black). But if you are starting out fresh, here are the colors I used.Squirt out a quarter sized amount of dark brown, medium brown, beige (skin tone is what I actually used), and black onto one plate.Squirt out a quarter sized amount of blue, and three shades of green onto a second plate.Paint the outside part of the ear, the outside edge of the head, the outside of the body and the outside of the tail medium brown. Use the darker brown color to paint the antlers, and the second part of the ear.Then with the beige color, paint the muzzle and connecting area between and over the eyes, the center part of the ear, the center part of the tail, and the tummy.Use a little of the dark brown to mix into some of the medium brown on the plate and run the brush around the outer edge of the ears, head, body and tail. Don’t add more paint but make a second stroke of the brush around these areas again to blend them a bit. This adds a little shading to the deer, making it look more three dimensional.Use a little of the medium brown to do the same thing around the edges of the beige areas. See my note above- don’t be a perfectionist about this! ;-)
- Background for fox or deer painting:Use your darkest green color to paint in the pine trees behind the fox. Make sweeping downward brush strokes (about 1 inch long) like shown in the video. Don’t worry if little bits of the canvas show through. You will be adding more color and strokes over this first layer!Next, use some of the lighter Yellow-green color on your brush and lightly go over the first color with the same downward sweeping brush strokes. You will make about half as many strokes of this color. You don’t want to cover up the dark green underneath.Again, don’t be a perfectionist. This is just to give the impression of a pine tree with dimension. Have fun with the process! Risk trying!!Lastly, paint the remaining blank canvas areas at the top with blue for sky. Good job!
- Cut the face holes in the canvas for your photo frame prop (deer or fox)Let your paint dry.When paint is dry, use a small Exacto knife to carefully slit the canvas in the center of the unpainted oval shape. This is just to get the scissors blade into. Then use some scissors to gently cut out the oval shape. This is where the person’s face will show through when getting their picture is taken of course.
Video
Notes
I hope this project brings you great joy and much fun at your woodland theme event. I’m smiling just thinking about it.
This is a great idea for a birthday party, a baby shower, or a school party.
I do think that kids could make these themselves. It would take some adult help perhaps but they would really like to contribute to the party I’m sure. Get them excited about it!